

How To Install A Shower Base With Tile Walls
How to Build Shower Pans
Learn the professional person fashion to build custom shower pans
![]() Time
Time
Multiple Days
![]() Complexity
Complexity
Intermediate
![]() Cost
Cost
$101–250
Introduction
Acquire how to build a custom-sized, waterproof shower pan for a curved shower enclosure past following these clear, detailed photos and step-by-step instructions.
Tools Required
Materials Required
- 1-1/iv-in. roofing nails
- 1"x3/four"
- 10d galvanized nails
- 1x4
- 2x4
- 2x6
- iii-in. drywall screws
- Ceramic flooring mix
- Duct tape
- Fiberglass mesh tape
- Galvanized expanded metal board
- Hardboard siding
- Shower drain assembly
- String
- Thin-set mortar
- Tile backer board
- Vinyl membrane
These days, if you want to put in a shower, you tin just go to a home middle and pick up a fiberglass unit of measurement. Before that was possible, pros had to build a custom shower pan by mixing and applying mortar, troweling information technology flat, and laying ceramic shower flooring tile.
Although fiberglass units make shower pans quick and easy, they lack the elegance of a handcrafted mortar and tile flooring. So if you'd similar to install a tile shower and are willing to build your ain custom shower pan, yous'll be able to tile it to match the walls. And with a mortar and tile floor, your shower tin be whatever shape. (For case, encounter How to Install a Glass Block Shower.) In fact, no matter what its shape, if the shower you have in heed doesn't adjust to the rigid size requirements of a manufactured base, a mortar floor may be your merely alternative.
You lot'll find that the cost of the materials used in a mitt-crafted base is roughly the same as the price of a comparably sized fiberglass pan. The downside is that instead of just plugging a manufactured unit into the opening, you lot'll have to do a lot more than work. You'll need a couple of days to course and tamp in ii layers of mortar, deal with some tricky vinyl membrane liner and so install the tile. Installing shower pans isn't a project for winging it or taking shortcuts. Poorly installed shower pans will leak, and the only correct manner to fix a poor installation is to rip out not only the base but also the shower walls.
The shower pan installed in this project is somewhat complicated, but the central techniques are the same for even the simplest shower — ane the size of a phone booth. If you accept experience with cement and some bones trowel skills, y'all should exist able to do virtually whatsoever size shower floor in less than two days, excluding tile work.
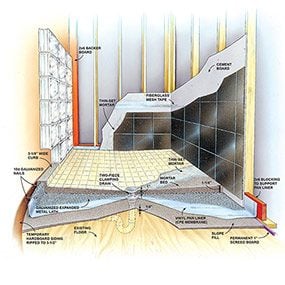
Anatomy of a Mortar Shower Floor
The first layer, called a sloped fill, is simply a mortar subfloor. It's sloped toward a special two-piece clamping-blazon drain (available at any habitation center) that is made specifically for a mortar bed shower flooring. The sloped fill up slants from the drain toward the perimeter of the shower with a slope of 1/4 inch per human foot. Since our shower had an boilerplate width of 3 feet, nosotros sloped upwardly from the 1/4-inch thickness of the drain to a 1-inch thickness effectually the shower walls and adjourn to get the necessary 3/4-inch slope.
The second layer, chosen the pan, is a durable CPE (chlorinated polyethylene) membrane. This vinyl liner is turned upwardly at the edges to create a waterproof membrane in the shape of a shallow pan. Water that works its way through the grout and the acme layer of mortar will flow down the slope to be tuckered through the cry holes of the drain. On top of the pan is a layer of expanded galvanized metal lath to reinforce the mortar. Over the lath, a sloped mortar bed is laid using the same 1/4-inch-to-the-foot slope rule we used for the sloped fill.
Shower curbs aid by containing water in areas that aren't bordered by walls. If a bleed becomes blocked, perhaps past a washcloth over the surface, a curb buys yous time. It volition dam the water within the shower for a while before it lets it run over onto the bathroom flooring.
(For a larger version of this cartoon, see Additional Information, beneath.)
Projection step-by-pace (xiv)
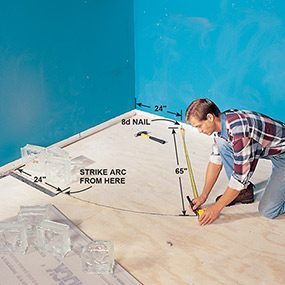
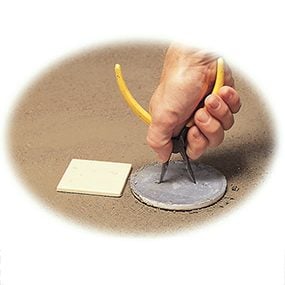
Pace 1
Draw the Floor
- Draw the outline of the shower floor on the subfloor to use every bit a pattern for setting the mortar forms.
- Nail an 8d nail next to the wall and strike a 65-inch arc for the curved form board.
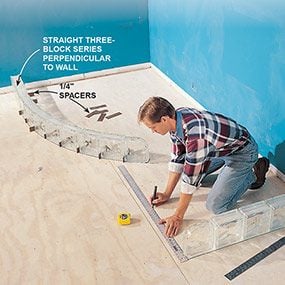
Step 2
Confirm the Layout
- Lay out the shower on the subfloor using your end materials—in this case, tile and drinking glass cake—to aid define its size and shape for shower pan installation.
CAUTION!
The shower we designed and installed here weighs upwards of i,000 lbs., or nearly the same equally a spa with a couple of people in information technology! If you lot live in an older home with 2x6 or 2x8 floor joists, you may need to beef up the floor with some beams or extra floor joists. If y'all're unsure, consult a edifice inspector. And if you accept a business firm that was built in the '70s, information technology could have a 5/8-inch particleboard underlayment that will need to be removed before starting.
![]()
Pace 3
Open up the Walls
- Cutting the drywall so that the seam of the drywall and cement board falls halfway behind the drinking glass block.
- Install backers in the stud wall to support the cement lath/drywall seam.
- Cut the elevation of the drywall at 6 anxiety, 2 inches above the plywood flooring to permit for the slope fill and two layers of 3-feet wide cement lath.

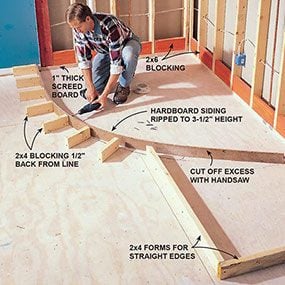
Step 4
Form the Curve
- Toe-smash 2x6 blocking at the base of the shower on interior walls to support the vinyl liner.
- Toe-spiral 2x4 blocks to the subfloor every 12 inches and 1/2 inch away from the line to allow for the thickness of the hardboard siding.
- Rip the siding to three-1/2 inches and screw information technology to the backside of the blocks for curved curbs.
- Toe-screw 2x4s for straight curbs and cut off the excess hardboard afterward forming.
- Pro tip: Toe screws are easier to remove after the mortar work is done.
- Nail in permanent 1-inch thick screed boards confronting walls.
- Rough-in the copper plumbing and bleed water lines.
Planning Shower Layout
Keep these elements in heed when y'all're sizing and positioning your shower:
The tile layout. It's easier to make up one's mind the size of the shower if your wall tile is selected ahead of time. Since nosotros had 12-inch tile, nosotros made small alterations in the size until we had wall lengths that made full tiles come out just behind the within edge of the drinking glass block.
Shower doors. If your shower will have a door, pick information technology out in advance to make sure the shower opening will arrange it. Don't forget to allow for the thickness of the tile and the cement board. When you're determining the size of the shower door and the management it should swing, consider other bathroom doors and fixtures.
Plumbing. It'southward evidently much easier to claw upwards a new shower that is located nearly existing plumbing. Copper water lines, sewer bleed lines and vents tin can be hooked up to pipes at a neighboring bathroom. Our shower backed up to a mutual wall that contained all the plumbing nosotros needed. If you're installing your shower in a remote location, it can be tough to get to the sewer drain and still go along the shower drain within the required distance from the bleed water vent. You lot may demand to rip out walls or the ceiling below the shower to reach hook-ups if the side by side level downwardly is finished. Sometimes plumbing a new bathroom is more work than edifice the shower from scratch.
Step five
First Layer of Mortar
- Remove the top half of the shower drain and plug the drainpipe with a rag to prevent debris from falling into the plumbing.
- Pack the mortar with a wood float, then screed the first layer of mortar.
- Use removable 1-inch screed blocks along curbs to establish a 1-inch to 1/4-inch slope toward the drain.
- Work the surface smooth with a woods float and smooth with a steel trowel.
- Allow the mortar harden overnight.
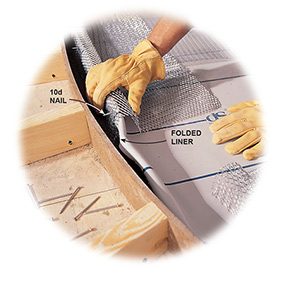
Stride half dozen
Lay in the Liner
- Tack upwardly scrap pieces of vinyl liner to protect the bodily liner from the precipitous edges of plumbing or electric plates.
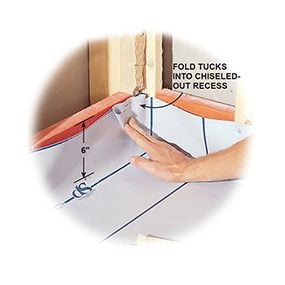
- Install the liner, running it up onto the walls at to the lowest degree 6 inches, and nail it to the studs with covering nails at the meridian edge.
- Experience the bleed flange bolts with your fingers and draw and carefully cut the liner to fit but outside the bolts.
- Cut off the liner against the curved edge one/two inch below the top of the form.

Step 7
Fold the Corners
- Chisel out the inside corners of the framing to create a recess for the liner folds.
Stride 8
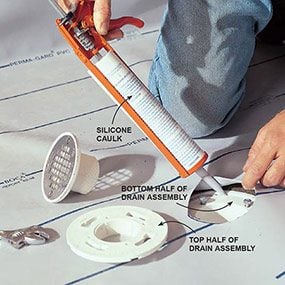
Make a Bleed Hole
- Cut out the vinyl liner for the drain with a utility pocketknife, cut just outside of the commodities holes.
- Run a bead of silicone caulk around the outer edge of the flange.
- Bolt down the superlative half of the bleed assembly.
- Comprehend the meridian of the drain with duct tape to protect it during the installation of the mortar bed and tiling.
Step 9
Attach the Tile Capitalist Lath
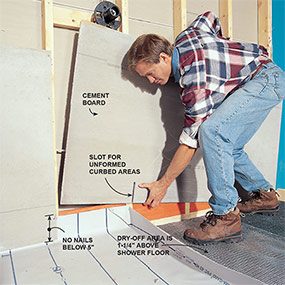
- Install cement board over the vinyl liner and spiral it to the studs with coated cement lath screws every viii inches.
- Cut slots in the cement board to become over curbed areas against the walls.
- Record the seams with fiberglass tape and sparse-gear up mortar or mastic.
- Pro tip: When setting the cement board, face the shine side out. This makes it much easier to spread the tile agglutinative and get a apartment surface for tiling and for drawing tile layout lines.
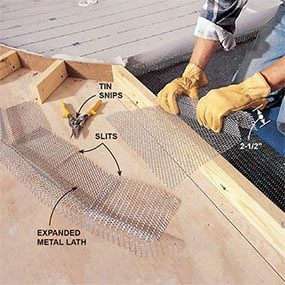
Stride x
Add the Metal Board
- With a pair of can snips, cut and lay in galvanized expanded metallic lath on peak of the liner just curt of the cement lath edges.
- Bend 12-inch x 3-human foot lengths of board over a 2x4 for adjourn reinforcement pieces.
- Keep the height barely under the form heights.
- Pro tip: For a curved adjourn, make a series of slits every ten inches to help it bend to the shape of the hardboard form.
- Pro tip:Avoid walking on the lath. Its sharp edges can puncture your waterproof membrane.
Step 11
Class the Curb
- Fold the vinyl liner and drop the pre-bent curb lath over the height of it.
- Poke a galvanized 10d blast through the board and top edge of the liner to go along it from collapsing while you pack the curb with mortar.
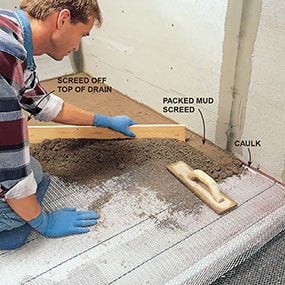
Step 12
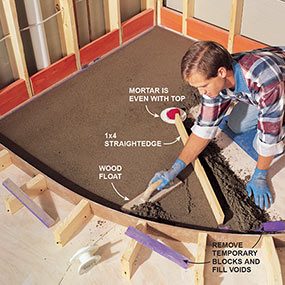
Cover the Lath with Mortar
- Snap chalk lines against the cement board, making them 1-ane/4 inch above the sloped fill.
- Adjust the height of the drain by screwing information technology upwardly or downwards until it is 1 inch above the top of the slope fill up.
- Pile mortar confronting the wall and compact it downwards to the line.
- Use the packed mortar as a guide for screeding off the mortar between the wall and the drain.
- Utilize the straightedge to locate high or low areas.
- Pack in mortar to fill depressions, and scrape off excess in the high spots.
- Use a steel trowel to smooth the bed and to tool precipitous edges at all corners for a cleaner tiling job.
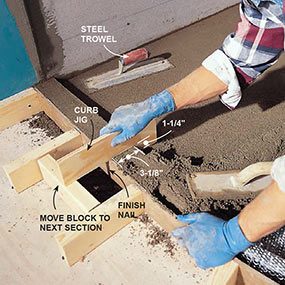
Step 13
Mortar the Adjourn
- Pack mortar into the lath with a wood float effectually the folded liner, then screed with a 3/4-inch plywood jig.
- After screeding, tool the edges of the curb with a trowel to obtain crisp edges.
Step fourteen
Suit the Drain
- Raise the shower bleed by unscrewing it until it is the same height as the flooring tile.
- Note: You have to do this before the mortar sets.
Boosted Information
- Since this commodity was first published, new materials accept get available for projects like this. See Pro Tile Tips for more data.
- Anatomy of a Mortar Shower Floor
Originally Published: Nov 26, 2022

Source: https://www.familyhandyman.com/project/how-to-build-shower-pans/
Posted by: labriolabourre1951.blogspot.com
0 Response to "How To Install A Shower Base With Tile Walls"
Post a Comment